Current Transducers: Split Core, Solid Core, and Why You Should Care
Current Transducers are a key component of every power monitoring system. If you have ever wondered why they are used or how they work, here's a...
7 min read
![]() Packet Power Team
:
Jan 12, 2022 7:07:00 AM
Packet Power Team
:
Jan 12, 2022 7:07:00 AM

When you ask how does branch circuit monitoring work, you're really asking how facilities and data center managers gain real-time, granular visibility into the load, health, and energy consumption of individual electrical circuits.
This happens not just at the mains or panel level but at every breaker or branch circuit feeding equipment. That level of insight changes monitoring from passive reporting to active management, and it is quickly becoming essential to modern power distribution strategies.
This article explores not just the basics of branch circuit monitoring (BCM), but how it operates, why it matters, how it is installed, what challenges can arise, and how to maximize its value. We’ll also include insights. For example, many organizations underuse BCM by treating it only as a metering tool, missing out on its potential as a dynamic risk-management and efficiency solution.
Branch circuit monitoring is the process of measuring, trending, and reporting electrical parameters such as current (amps), voltage, power (kW), energy (kWh), and sometimes power factor or harmonic distortion. It does this at the level of each individual branch circuit, or breaker, downstream of a panel.
This matters because many facilities only monitor at the utility meter or main panel, believing they have full insight. In reality, major problems often begin further downstream.
Overloaded breakers, imbalanced phases, hot spots, and underused circuits are missed when only the main panel is monitored.
Branch circuit monitoring gives you control and visibility at the most detailed level. It enables:
BCM's real power comes from using the data to make operational decisions. It is not just for tracking numbers. You can shift loads, rebalance phases, plan future installations, and even negotiate energy billing with tenants when BCM is fully integrated into your strategy.
To understand how does branch circuit monitoring work, we need to look at its core workflow, from sensors to decision-making.
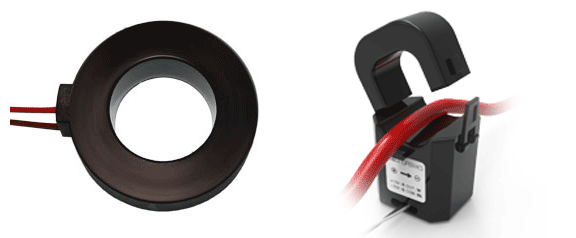
The system starts with current transformers (CTs) or Rogowski coils. These devices measure the current flowing through individual conductors in each branch circuit.
Most CTs are split-core, which allows them to be installed without disconnecting the circuit. One manufacturer offers auto-correcting CTs that snap onto live circuits safely and efficiently.
Voltage is measured either directly or through the monitoring panel. Each CT is mapped to a specific channel and phase: A, B, or C. Proper mapping ensures that three-phase loads are correctly identified and monitored.
Once installed, the CTs feed measurement data into a monitoring device. This data is collected in real time, often in sub-minute intervals. It is transmitted to a central dashboard via wired Ethernet or wireless connection.
Some systems support plug-and-play networking, which reduces setup time and IT overhead. In multi-site deployments, cloud dashboards make it easy to oversee electrical performance from anywhere.
The data is then processed and displayed in a dashboard or DCIM (Data Center Infrastructure Management) system. These platforms allow users to view real-time metrics, historical trends, set alert thresholds, and review electrical capacity data.
You can configure the system to send alerts when certain conditions are met, such as a branch circuit exceeding 80% of its rated capacity.
This is where many BCM installations fall short. Data needs to drive action. With accurate, real-time insights, teams can shift loads, reassign circuits, or schedule repairs before failures happen.
Organizations that actively use BCM data for decisions reduce risks, optimize space, and often uncover ways to cut energy costs.
Many teams miss the hidden benefit of BCM—circuit-level visibility makes it easier to identify unusual energy patterns. For example, BCM can help you catch phantom loads, detect equipment left running after hours, or isolate a failing compressor that is drawing more power than normal.
It’s important that the installation is done by a qualified professional. They should wear the proper protective equipment whenever handling a CT on a live conductor.
Disconnect power to the panel if possible. If it is not possible to disconnect power, always treat CT leads as though they carry line voltage.
Mount the monitor as close as possible to the panel being monitored. The monitor can be mounted on the panel itself, on a wall, or under a raised floor.
Run the CT interconnect cables and voltage leads from the monitor into the panel. Then connect the voltage leads. It is best to use a three-pole breaker because it provides overcurrent protection and offers a convenient means of disconnecting power from the branch circuit monitor.
Be sure to connect the voltage leads to the correct phase based on your voltage service type. After that, connect the ground wire to earth. This is critical.
If you fail to properly ground the monitoring device it could result in a dangerous or fatal electrocution.
Mount the CT Interconnect Board inside the panel. Clean the inside of the panel and use the tape provided to mount the CT interconnect boards.
Make sure to orient the board so that the black connector header faces away from the panel. Attach the connector at the end of the CT interconnect cable to the corresponding CT interconnect board header.
The interconnect cables and boards are labeled to help you connect the right ones. If you connect them wrong you will get incorrect readings.
Route each CT harness inside the panel and secure them as desired. Use the latch on the side of the CT to open it. Position the CT on the conductor so that the CT lead faces toward the load and away from the source.
Connect each CT to the conductor. Close the CT and ensure the latch has clicked into place. Each CT lead from the wire harness will have a label. Connect the CT tail to the corresponding CT wire harness lead using the quick connectors.
Connecting a CT to the wrong wire will lead to incorrect readings. If you are monitoring infeed circuits, follow the same process for installing the infeed CTs.
After all components are installed, you can switch power on to the device. Once power is supplied, the branch circuit monitor will automatically begin to transmit data. It is always a good idea to verify readings against other sources to ensure the installation was performed correctly.
Packet Power’s monitors transmit data wirelessly using a secure purpose-built wireless protocol, proven to work in facilities worldwide. It is unlikely you will run into problems while installing Packet Power’s branch circuit monitors. If you do, we are happy to help. Email support@packetpower.com.
If you are looking to monitor equipment at the circuit level that is an option with Packet Power devices as well.
A BCM system gives you access to multiple electrical parameters:
Advanced systems may also track harmonic distortion or breaker thermal conditions. This allows for deeper analysis, such as detecting slowly rising loads that could indicate mechanical degradation.
BCM is used to track rack loads, avoid circuit overloads, and maintain redundancy in A/B power paths. Some operators also use BCM to monitor cooling systems and optimize power usage effectiveness (PUE).
Manufacturers use BCM to track energy-intensive equipment, monitor production lines, and detect downtime patterns based on electrical data.
Landlords can assign energy costs fairly by metering tenant circuits separately. BCM simplifies billing and improves transparency.
Providers can monitor and bill clients based on exact circuit usage. This builds trust and prevents overcharging.
Engineers use BCM data to track energy-saving efforts, identify inefficient equipment, and meet sustainability goals.
Older buildings and live panels can be difficult to access. Labeling errors and tight spaces may slow down installation.
Incorrect orientation or phase mapping causes inaccurate readings. Technicians must double-check every installation point.
Without filtering and meaningful alerts, dashboards can become overwhelming. Teams need to define key thresholds to prevent alert fatigue.
BCM should integrate with your broader facility management systems. Network compatibility and data security must be planned in advance.
Data is only useful if people use it. Teams need training and support to turn insights into decisions.
Know when panels or circuits are nearing their limits.
Spot and fix overloads before breakers trip.
Identify underused circuits and idle equipment.
Support chargeback and billing with accurate data.
Investigate breaker trips or energy spikes faster.
When BCM data is used across planning and operations, it leads to stronger infrastructure performance.
Main meters show only total panel load. BCM reveals which circuits are overloaded or underused.
PDUs monitor outlets, not circuits. BCM gives upstream visibility and works across multiple panels.
Use branch monitoring when you need:
BCM systems cost more than basic meters, but the value they provide often outweighs the difference.
Monitor high-risk panels or racks first. Demonstrate the value to stakeholders before expanding.
Select systems that allow channel expansion, modular CTs, and remote management.
Standardize your circuit names and alert templates. This ensures clarity across all sites.
Use cloud-based or networked dashboards that show trends across multiple buildings.
Use BCM data to support long-term planning, carbon reporting, or efficiency metrics.
To truly understand how does branch circuit monitoring work, you need to see it in action. The value comes from more than just the technology—it comes from what you do with the data.
Whether you're managing a data center, factory, or commercial building, BCM gives you visibility that drives better decisions. You reduce downtime, improve safety, save energy, and gain a clear picture of how your facility operates—circuit by circuit.
Contact Packet Power to see how branch circuit monitoring can support your goals and fit seamlessly into your infrastructure. Let’s make smarter energy management simpler.
Main metering shows total load, but BCM breaks it down by each circuit. This allows for better capacity and risk planning.
Not always. Many CTs are split-core and can be installed without shutting down power. Consult a licensed electrician for your specific setup.
Accuracy depends on the CTs, wiring, and mapping. High-quality systems can achieve billing-grade accuracy.
Yes. Many modern systems, including Packet Power’s, support wireless data transmission and remote dashboard access.
Systems vary. Some support up to 96 circuits per controller and can scale across multiple panels.

Current Transducers are a key component of every power monitoring system. If you have ever wondered why they are used or how they work, here's a...
![Installing Packet Power Smart Power Cables [VIDEO]](https://www.packetpower.com/hubfs/Blog/Packet%20Power_Smart%20Power%20Cable%20Install.jpg)
Monitoring the power usage of any device that with a plug is simple with Packet Power’s Smart Power Cables. Just how easy is it? This short video...

There are countless reasons for monitoring power in data centers. We've outlined some of the most common applications and the resulting benefits....